Install Hirens Boot CD on DriveDroid
In this tutorial we will go through the process of installing Hirens Boot CD on a DriveDroid image. This is very similar to the process of installing other systems. The steps are as follows:
- Create a blank image in DriveDroid of reasonable size.
- Select the image in DriveDroid, so that it becomes available on your PC as an USB drive.
- Follow the instructions at Hirens Boot CDs page on how to install Hirens on a USB drive.
This also applies to other systems, but for those systems the instructions on how to install them to a USB drive will, of course, differ. In this article we will focus on install Hirens Boot CD.
Requirements
- A phone with DriveDroid installed
- An USB cable
- A PC with Windows installed
- 7-Zip
Hirens.BootCD.15.2.zipfrom hirensbootcd.orgUSBFormat.zipfrom hiren.infogrub4dos.zipfrom hiren.info
Creating a blank image in DriveDroid
The first step is creating a blank image in DriveDroid where we will install Hirens Boot CD on. You will find the option 'Create blank image...' under the + menu in DriveDroid:

Next choose a filename, set the size to 650MB, uncheck 'Partition Table (MBR)' and set filesystem to 'None'. It should look like:

Next hit create and wait for the creation process to complete. This usally takes at least a minute.
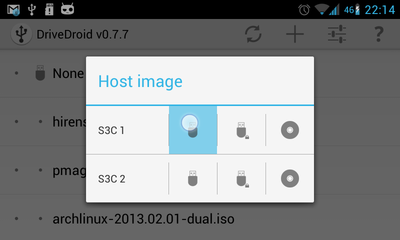
Now we have a blank image. It is time to use it. You should be able to see the image in DriveDroids image list. Tap the newly created image:

A dialog will popup where you can select in what mode to host the image. Your dialog might differ, but the options are from left to right:
- Writable USB-disk
- Read-only USB-disk
- CD-rom disk
On my device I have two host-devices, so I see two rows. For our purposes we want to create a USB-disk and we need the PC to be able to write to it, so we choose the first option:
A USB-disk should now popup on your PC. From here on we can loosely follow the tutorial on how to install Hirens Boot CD to an USB-drive that is found on their site.
Installing Hirens Boot CD
From their tutorial we can see that we first need USBFormat. Download and extract the zip and run USBFormat as an administrator. Next look for the USB-disk in USBFormat. For me it shows up as 'Linux File-CD', but that may differ on your phone/rom/kernel. Once you have the USB-drive selected use the following settings to format the disk:
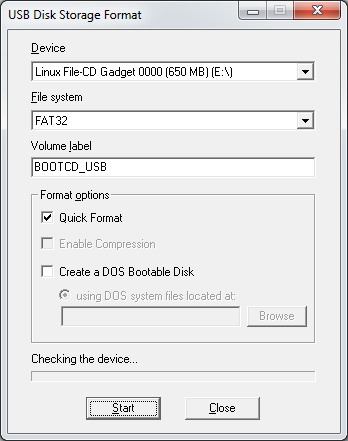
Once USBFormat has finished, you'll notice that the disk now becomes available on Windows and allows you to put files on it.
For the next step we need to use grub4dos. Download and extract the zip and run grubinst_gui.exe as administrator. Look for the USB-disk by looking for the correct size (around 650MB) and use the following settings to install Grub4Dos onto the USB-disk:

Next, copy grldr and menu.lst from grub4dos.zip to the USB-drive.
Now it's time to put the rest of the files of Hirens Boot CD onto the USB-drive. First download and extract the file Hirens.BootCD.15.2.zip from their download page. You should see an ISO file named Hiren's.BootCD.15.2.iso. We will use 7-zip to extract the files from the ISO to the USB-disk. Click with right mouse on the ISO, choose 7-Zip and 'Extract files...':

Next enter the location of the USB-disk (use Browse if you aren't sure). Extraction will take several minutes.
When the extaction process is finished you should have the following files on your USB-disk:

Finally, make sure to safely remove the USB-disk from Windows. This is to ensure all data is being written to the disk (which is usually cached by Windows for a while). After doing so, open up DriveDroid on your phone and tap the image again. Now instead of using the first option, choose the USB-disk in read-only mode (the padlocked USB icon). This will ensure the USB-disk cannot change whenever the image is hosted in this mode. If you ever want to write some files onto the disk, choose writable USB-disk-mode.
Now reboot your PC. It should now be able to boot Hirens Boot CD from your phone. Enjoy!