Shrinking images on Linux
When creating images from existing ISOs you often need to allocate a number of MB for the image to at least fit the files that are in the ISO. Predicting the exact size of the image is hard, even for a program. In this case you will create an image that is larger than actually needed: the image is much larger than the files on the image are combined.
This post will show how to shrink an existing image to a more optimal size. We will do this on Linux, since all required tools are available there: GParted, fdisk and truncate.
Requirements
- A Linux PC
- Some knowledge how the terminal works will helps
- The unoptimal image (
myimage.imgin this example)
Creating loopback device
GParted is a great application that can handle partition tables and filesystems quite well. In this tutorial we will use GParted to shrink the filesystem (and its accompaning partition in the partition table).
GParted operates on devices, not simple files like images. This is why we first need to create a device for the image. We do this using the loopback-functionality of Linux.
First we will enable loopback if it wasn't already enabled:
$ sudo modprobe loop
Now we can request a new (free) loopback device:
$ sudo losetup -f
This will return the path to a free loopback device. In this example this is /dev/loop0.
Next we create a device of the image:
$ sudo losetup /dev/loop0 myimage.img
Now we have a device /dev/loop0 that represents myimage.img. We want to access the partitions that are on the image, so we need to ask the kernel to load those too:
$ sudo partprobe /dev/loop0
This should give us the device /dev/loop0p1, which represents the first partition in myimage.img. We do not need this device directly, but GParted requires it.
Resize partition using GParted
Next we can load the device using GParted:
$ sudo gparted /dev/loop0
This should show a window similar to the following:
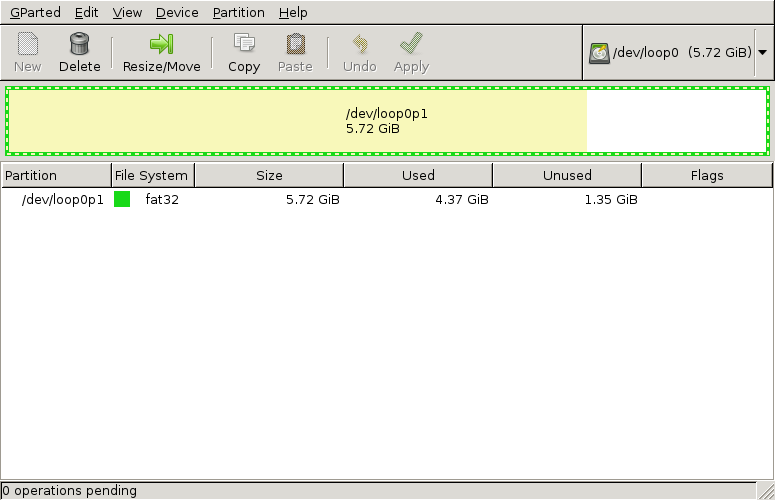
Now notice a few things:
- There is one partition.
- The partition allocates the entire disk/device/image.
- The partition is filled partly.
We want to resize this partition so that is fits it content, but not more than that.
Select the partition and click Resize/Move. A window similar to the following will popup:
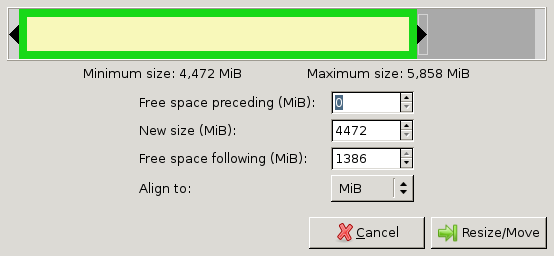
Drag the right bar to the left as much as possible.
Note that sometimes GParted will need a few MB extra to place some filesystem-related data. You can press the up-arrow at the New size-box a few times to do so. For example, I pressed it 10 times (=10MiB) for FAT32 to work. For NTFS you might not need to at all.
Finally press Resize/Move. You will return to the GParted window. This time it will look similar to the following:
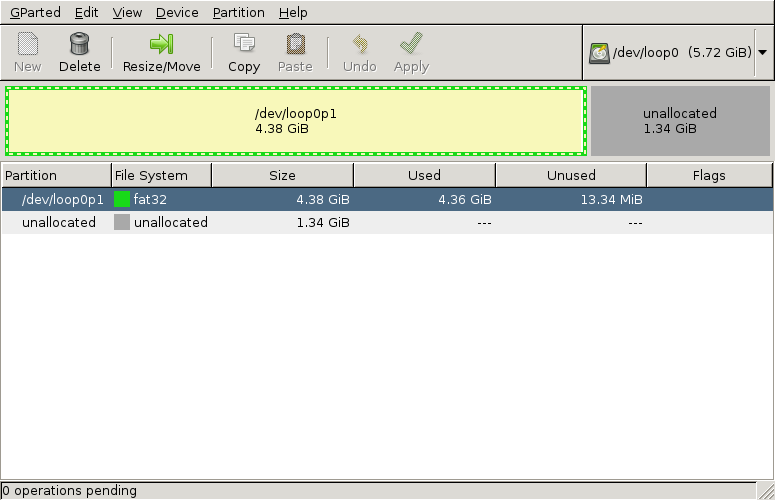
Notice that there is a part of the disk unallocated. This part of the disk will not be used by the partition, so we can shave this part off of the image later. GParted is a tool for disks, so it doesn't shrink images, only partitions, we have to do the shrinking of the image ourselves.
Press Apply in GParted. It will now move files and finally shrink the partition, so it can take a minute or two, most of the time it finishes quickly. Afterwards close GParted.
Now we don't need the loopback-device anymore, so unload it:
$ sudo losetup -d /dev/loop0
Shaving the image
Now that we have all the important data at the beginning of the image it is time to shave of that unallocated part. We will first need to know where our partition ends and where the unallocated part begins. We do this using fdisk:
$ fdisk -l myimage.img
Here we will see an output similar to the following:
Disk myimage.img: 6144 MB, 6144000000 bytes, 12000000 sectors
Units = sectors of 1 * 512 = 512 bytes
Sector size (logical/physical): 512 bytes / 512 bytes
I/O size (minimum/optimal): 512 bytes / 512 bytes
Disk identifier: 0x000ea37d

      Device Boot      Start         End      Blocks   Id  System
myimage.img1            2048     9181183     4589568    b  W95 FAT32
Note two things in the output:
- The partition ends on block 9181183 (shown under
End) - The block-size is 512 bytes (shown as
sectors of 1 * 512)
We will use these numbers in the rest of the example. The block-size (512) is often the same, but the ending block (9181183) will differ for you. The numbers mean that the parition ends on byte 9181183*512 of the file. After that byte comes the unallocated-part. Only the first 9181183*512 bytes will be useful for our image.
Next we shrink the image-file to a size that can just contain the partition. For this we will use the truncate command (thanks uggla!). With the truncate command need to supply the size of the file in bytes. The last block was 9181183 and block-numbers start at 0. That means we need (9181183+1)*512 bytes. This is important, else the partition will not fit the image. So now we use truncate with the calculations:
$ truncate --size=$[(9181183+1)*512] myimage.img
Now copy the new image over to your phone, where it should act exactly the same as the old/big image.