Using Rufus to create bootable USB images
Rufus is a seemingly simple, but very excellent tool for Windows that handles a lot of work formatting USB drives and making them bootable. Most notably it can burn most ISO files to USB very efficiently. This makes it a very valuable tool for DriveDroid users.
The features of Rufus I liked most:
- Burns any Windows ISO (XP, 7 or 8)
- Burns any Linux-based ISO (ArchLinux, Ubuntu, Knoppix, etc)
- Burns a number of handy ISOs (Hiren's Boot CD, FreeDOS, BartPE, Ultimate Boot CD)
- Handles UEFI as well as legacy booting
- Handles GPT as well as MBR partition tables
- Open source
This post will go through the steps of creating an image in DriveDroid and burning an ISO to that image using Rufus.
Requirements
- Rufus 1.4.9 or higher
- Android phone with DriveDroid
- USB cable
Creating a blank image in DriveDroid
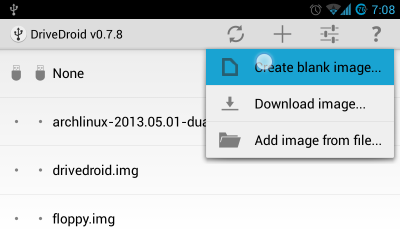
The first step is creating a blank image in DriveDroid where we will burn our ISO of choice on. You will find the option 'Create blank image...' under the + menu in DriveDroid:
Next choose a filename and a size for the image that is appropriate for the ISO you're burning. Also uncheck 'Partition Table (MBR)' and set filesystem to 'None', since Rufus will handle this for us later:

In this example we have used 1000MB to burn Windows XP. Generally you should choose a tad bit more than the side of the ISO you want to burn.
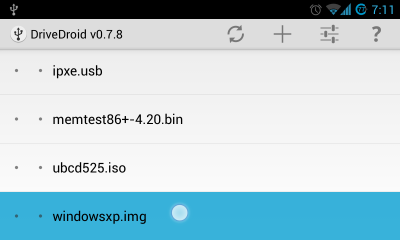
Once image creation has finished you can select the image in DriveDroid.
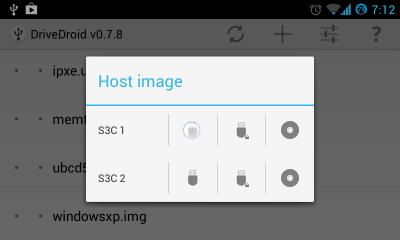
DriveDroid will pop up a dialog asking how to host the image. Choose the first option to host the image as a writable USB drive:
Now plug in your phone into your PC and start Rufus.
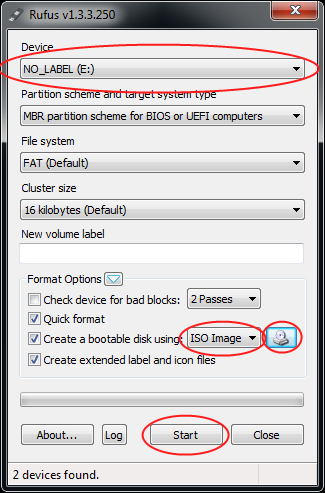
Choose the USB device that corresponds to your phone. This is shown as NO_LABEL in Rufus.
Note that when the USB device is not showing up in Rufus, click on the white triangle next to 'Format Options' and check 'List USB Hard Drives'.
Check 'Create a bootable disk using:', choose 'ISO Image' from the dropdown box and click the CD-rom icon to choose the ISO you want to burn. Once the ISO is scanned by Rufus, it will fill in other options automatically.
Press 'Start' to let Rufus burn the ISO to your phone and make it bootable.
Once Rufus is finished you can reboot your PC and choose your phone from your bios to boot off of your newly burned ISO. Enjoy!